You’ll likely feel out of your element when you’re just starting snowboarding. And may potentially find yourself wondering how to start.
You can learn to snowboard in a day, with each hour spent learning something new. First, you will need to prepare your gear, and then you will need to learn to ride the lift. Next, prepare to learn the snowboarding fundamentals, which is when you’ll experience the joys of snowboarding.
Below, we cover in extended detail how you can snowboard in a day by the hour.
How Do I Learn To Snowboard In One Day?
To learn how to snowboard in just one day, you’ll want to break it down into hourly sections, with each hour spent learning the fundamentals of the sport.
Learning to snowboard in a day is difficult, but it can be done.
Doing this presents many obstacles to overcome, but we’ve outlined in detail the process you’ll go through on your first day of snowboarding.
Summary Table – Hourly Schedule Of Learning To Snowboard In A Day!
| The Day Before | Getting the right gear and setting up your board |
| First Hour | Preparing your body |
| Second Hour | Riding the ski lift, getting used to snowboarding etiquette |
| Third Hour | Learning the barebones fundamentals of snowboarding |
| Fourth Hour | Picking up more key parts of snowboarding like turning and stopping |
| Fifth Hour | Resting your body and taking a break |
| Sixth Hour | Beginning to have fun with snowboarding |
The Day Before
Although this article is about learning to snowboard in one day, you’ll need a little preparation beforehand to maximize your day on the slopes.
During the days leading up to your mountain visit, you’ll want to spend time gathering your equipment, ensuring that you have everything and that it fits correctly.
The first things you’ll want are articles of clothing that will keep you warm and safe from the elements. This is where layering comes into play.
You’ll want a base layer, a mid-layer or insulating layer, a shell layer, or a layer that outwardly protects you from snow and wind.
Each of these layers is crucial for staying warm when snowboarding; if you get too hot, you can always remove a layer.
a. Preparing Your Board
You’ll also want to ensure that your board is set up in advance so you can get on the hill as fast as possible.
To do this, you will have to know your riding stance, which is which foot will face forward when snowboarding.
There are two types of stances, regular and goofy.
In a regular stance, your left foot faces towards the front of the board, and your right foot will face forward in a goofy stance.
There’s no right or wrong stance, whatever feels more natural to you is your best bet.
If you don’t know your stance already, there are a few tests you can try to see which way works best for you. The first test is to kick a ball.
If you kick instinctively with your right foot, you’re most likely regular. You’re most likely goofy if you kick instinctively with your left foot.
The second test is to do a handstand. If you step out with your right leg first, you are probably goofy; if you step out with your left, you’re probably regular.
Knowing your stance will allow you to set up the bindings on your board.
b. How to Set Up Your Bindings?
To set up your bindings, you must determine which foot is going forward using the methods above.
Then you can position each binding at an angle to the board by maneuvering the base plates.
Your bindings base plate will have markings ranging from 0-30 in positive and negative directions.
Generally, the most commonly preferred angle for a front binding is +15 to +21 degrees.
There is a bit of a disagreement on the best back binding angle for beginners, but somewhere between +3 and -15 should be good.
Get exploring and see what feels good to you. You can always change them later.
To change the angle, just unscrew the bindings from the board and locate the base plate; these are often different shapes and may be covered with a cushioned footbed.
They are usually reasonably identifiable, as they display the numbers of the angles. If you’re having trouble, take the board to your local snowboard store.
You’ll want the bindings to fit your boot snugly so that they do not move if you try to lift up your foot. If it’s too loose, simply tighten the toe and ankle straps.

First Hour
Once you’re up on the hill, you’ll want to head into the village to get your lift pass. There are various passes depending on how many days you want to ride.
If you’re only there for the day, just purchase a day pass.
The village is also where you can pick up any rental gear if you’re looking to hire a board or boots and also where you start snowboarding lessons.
After you’ve got your lift pass, ensure that you warm your body up for the challenging day ahead with a series of stretches.
Snowboarding takes a toll on your body, and not stretching could leave you at risk of injury.
The specific stretches you do matter, as you will want them to primarily be oriented towards the body parts you will use snowboarding.
You’ll want to do stretches that prioritize the core, and your upper body, especially your shoulders and arms.
You will also want to do stretches for your lower body, namely your calves and quadriceps.
Getting your body warmed before snowboarding is essential, as it prepares your body for the physically demanding day ahead.
Second Hour
Now that you’ve made it to the mountain, you’ll need to familiarize yourself with the chairlifts, as they are your main transportation up the hill.
You will also want to familiarize yourself with the mountain trail map, as this will show you each run and its difficulty.
The runs are marked in different colors that denote their difficulty. The colors change depending on where you are in the world.
Generally, green is for beginners, and black is for experienced riders. Stick to the beginner runs to get the most out of your first day.
1. Preparing for the Ski Lift
Before getting on any ski lift, see if your mountain has a magic carpet, which is a conveyor belt that takes you to the top of a beginner run.
If you have the option to use one instead of a lift, you should try it out, as it’ll be much easier than using a ski lift.
If not, find the lift that takes you up to the beginner mountain. There’s a possibility you may have to jump on a gondola to get to the lifts.
The other possibility is that you find a traditional ski lift. Either way, you’ll be taken to the top of the run.
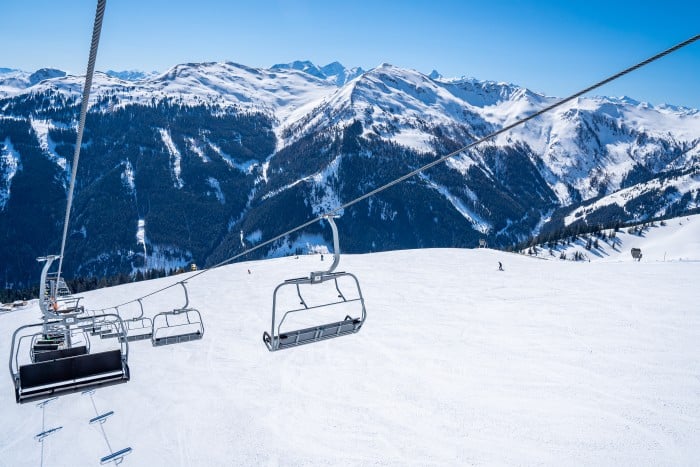
2. Using The Ski Lift
To get on a traditional lift, watch how other riders ahead of you get on, to get a visual understanding.
Then, if you haven’t already, strap your board on, leaving your back foot out so you can skate up to the lift line.
Once you’re there, approach the gates ahead of you, getting ready to make your way up to the chair.
Wait for the chair in front of you to go, and then make your way up to the marked line, with the other people catching the chair.
Behind you, the chairlift should be coming. The chair should gently hit you in the back of the leg, indicating that it’s time to sit down.
Once you’re on, you may want to put down the safety bar. This is a perfect time to practice snowboarding etiquette.
You will want to inform everyone on the chair that you will be lowering the safety bar, as it’s not always done, and you’ll risk hitting someone on the head if you don’t warn them of the bar.
When getting towards the end of the lift, lift up the safety bar, then prepare to get off by shuffling yourself forward on the chair.
Once it’s time to get off, step onto the snow with your strapped foot and then rest your back foot on the inside of your back binding.
Ride down the ramp, adopting the same stance as regular snowboarding.
This is where a stomping pad comes in handy, as it’ll keep your back foot from sliding off your board when getting off the lift.
You will then need to sit down to strap your back foot in and then stand up to make your way down the hill.
Third Hour
Your third hour will be spent learning the fundamentals of snowboarding.
Use this hour to learn to balance, stop, and fall correctly, as these core skills will enable you to advance your skill set further.
1. Learning to Balance and Stop
To learn how to stop as a beginner, you will want to check out our detailed guide: How Should A Beginner Stop On A Snowboard?
Maintaining proper posture is the key to learning to stop.
To get into the appropriate posture, bend your knees generously so that you are in a squat, with your back straight and head up.
Once you’ve got this down, you can learn to stop. The easiest way for a beginner to learn to stop is to practice digging their heel edge into the snow.
To do this, face your body downhill, then put pressure on both heels, lifting your toes slightly while gently adopting the squatting posture.
This will gradually bring you to a stop. You can play around with the amount of pressure needed to stop; if you fall, you’re only falling onto your bum!
Learning to do all this is a gradual process that’ll take some time, so use this time to practice as much as possible.
Don’t be afraid if you don’t get it on your first, second, or even third try. It’ll take plenty of time, and that’s okay.
2. Learning to Fall
Learning to fall safely is also a significant part of snowboarding.
To fall safely, fall onto the side of your arms, ensuring that you don’t outstretch them but keep them bent towards your body, to work as a cushion alongside your shoulder.
Additionally, ensure that your knees are bent when falling to protect them from injury.
Fourth Hour
During the fourth hour, you will want to learn how to turn. By this point, you should know how to stop and keep yourself balanced on your board.
This is fundamental in learning to turn, so if you haven’t got those skills down yet, use this hour to keep practicing.
Learning to Turn
Learning to turn is a crucial element of snowboarding. You will need to learn two turns to effectively get around the hill: a heel side turn and a toe side turn.
Start by learning a heel side turn, as these feel more natural for many people.
a. How To Do A Heel Side Turn?
To do a heel side turn, slowly bend your knees, centering your weight on your quads.
To initiate the turn, dig your heel edge into the snow while simultaneously lifting your toes towards the sky and sinking into the squatting posture a little more.
The weight of your body should now be slightly over the heel side of your board, and your body should be in a squat.
Next, point your forward-facing shoulder in the direction you want to turn while putting additional pressure on the heel of your forward-facing foot.
Putting all these steps together should result in a turn.
Once the turn is complete, release the pressure from your heels while standing up on your board, allowing the base to become flat on the snow.

b. How To Do A Toe Side Turn?
Once you’ve mastered the heel side turn, it’s time to start learning the toe side turn.
To do a toe side turn, slowly bend your knees, centering your weight on your quads.
To initiate the turn, dig your toe edge into the snow while lifting your heels towards the sky and sinking into the squatting posture a little more.
The weight of your body should now be slightly over the toe side of your board.
Next, point your forward-facing shoulder in the direction you want to turn while putting additional pressure on the toe of your forward-facing foot.
Putting all these steps together should result in a turn.
Once the turn is complete, release the pressure from your toes while standing up on your board, allowing the base to become flat on the snow.
Fifth Hour
At this point, hopefully, you will have some of the basics down and will probably be feeling fairly tired.
Take this time to have a break, making sure you get some food and rehydrate.
Snowboarding is demanding and requires a lot of energy, so taking time to refuel your body and have a little rest is essential.
Sixth Hour
During the sixth hour, you should have enough of the basics down to begin more advanced snowboarding.
You can spend the rest of your learning to link your turns by putting together a heel side turn and toe side turn.
If you’re not there yet, use this hour to keep practicing the basics.
You should start to enjoy snowboarding during this hour as you have learned most of the basics.
Final Thoughts
Your first day of snowboarding will be long, as there’s a lot to learn in a short period.
Using this step-by-step guide, you should be able to learn to snowboard in one day while having a great time on the mountain.
You’ll spend each hour progressively learning more and more skills, continuously improving as you learn the fundamental aspects of shredding.